If you have a spare, old, unwanted PC power supply unit (PSU) just gathering dust, perhaps it could enjoy a new life as a bench power supply. This is probably the exact thought that fired across man-cave hobby channel Handmax Workshop’s neurons, which recently published a 5-minute video entitled ‘Don’t throw away your old PC PSU – do this instead!’
Probably the most useful feature of such a device is to deliver an accurate, stable DC voltage for testing things if you have run out of batteries or you suspect the device is broken due to a battery compartment issue (e.g., corrosion). Of particular attraction is the outputs that deliver a voltage you dial in, typically by turning a knob on the unit.
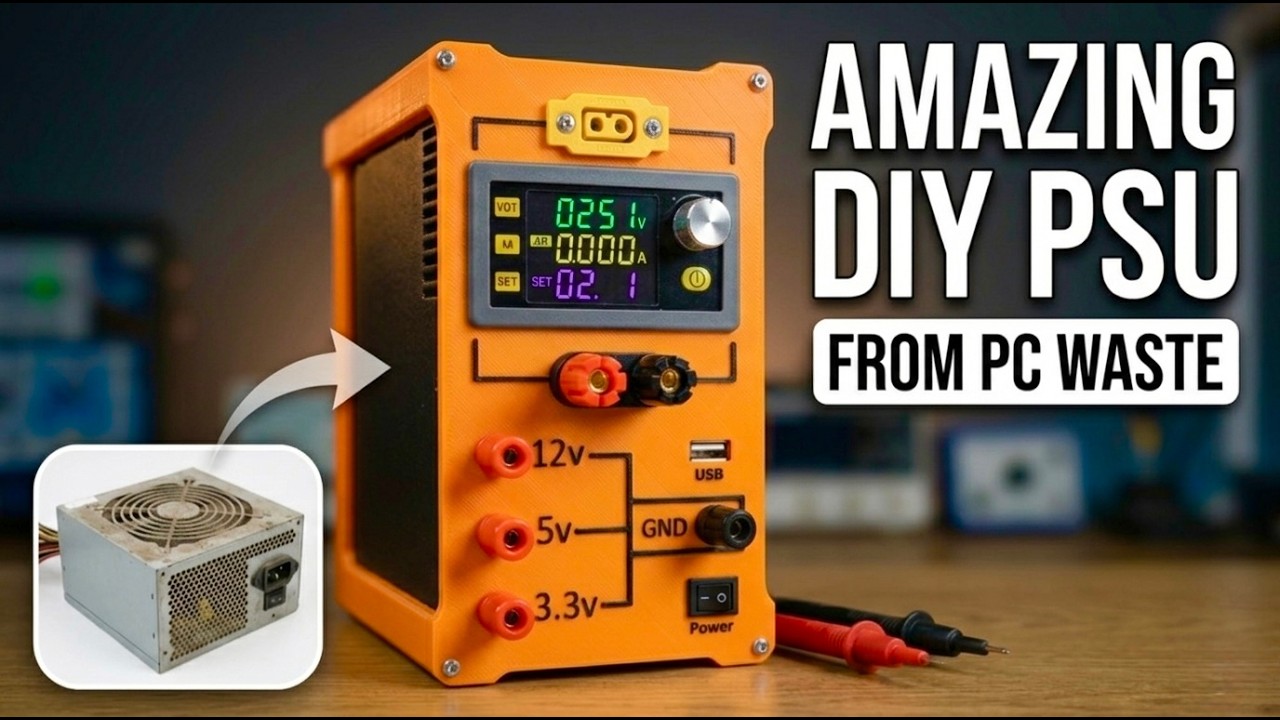
Article continues belowHandmax Workshop shows the ‘donor’ PC PSU is a very old one from the Pentium 4 era, which is rated at 350W. Its fan was also extremely dusty, but that was remedied, and we guess it was previously tested to be fully functioning.
Next up, the DIYer strips down the PSU, snipping the wires (wire length requirements will be much reduced in this project). With this era of PSU cables being color-coded, which is no longer a trend, the TechTuber flashes up a handy colorized guide to an ATX PSU’s main connector pinout (roughly 1 minute into the video).


The new bench power supply will need a chassis with a panel to mount the usual outputs, dials, and so on. So, Handmax Workshop turns to their Bambu Labs A1 to 3D print a nice two-art two-tone frame and panel. The design incorporates enough room beneath the front panel for the new wiring routes, etc. Handmax Workshop kindly makes the 3D printer files available via a link in the video description.
In addition to the old PC PSU and the 3D printer output, it is necessary to add some key components to make a working and useful bench power supply. The most important additions are as follows, and they aren’t very expensive:
- A 120W voltage regulator with LCD display, active cooling, and serviceable quality – adjusts output voltage between 0 and 36V
- An XT60 connector, where you will tap into your finely adjusted voltage output
- Below that are two banana sockets, which will also tap into the adjustable voltage (using splitters inside the build chassis) out
- Sockets for ground, 12V, 5V, and 3V – these are wired direct from the original PSU rails
- An on/off switch for the bench power supply
- A red LED to indicate whether the unit is on or off


As there was extra space on the panel, the DIYer decided to add a USB port on the front panel, complete with a fast charging circuit. We see in the finished build that it was a Type-A port chosen. This port can run from any input between 10 and 30V, so it was simply connected to the 12V line.
I noticed in this project that there are potential polarity hurdles to navigate when doing your wiring. It is a nice brief video, but due to this and the lack of accompanying written instructions, etc., it doesn’t look like a foolproof plan for a novice. Also, this is mainly a fun e-waste saving project as a new bench power supply isn't prohibitively expensive, with many available for around the $50 mark.

Follow 3DTested on Google News, or add us as a preferred source, to get our latest news, analysis, & reviews in your feeds.